If you searched for Gimkit host, you probably want to do something right now. Maybe you have a Kit ready and cannot figure out how to start the game. Maybe you are looking for the host code so your students or friends can join. Or maybe you joined Gimkit before, but you have never been the person running the game.
The good news is that hosting becomes much easier once you know what happens at each stage. You choose what you want to play, set up the game, open the lobby, share the joining details, and then start the session.
What Does “Gimkit Host” Mean, and What Are You Trying to Do?
When you are the Gimkit host, you are the person who creates and starts the live game. You are not simply another player waiting for someone else to start it.
Think of it like running a small classroom game. You choose the questions or Kit, pick the game mode, set the available options, let everyone into the lobby, and then start the game.
Students or other players have a different job. They normally use the code or link provided by the host to enter the game.
That difference matters because many Gimkit searches mix up hosting and joining. If you are trying to host, looking for a join screen is not going to get you very far.
What being the host actually means
The host controls the live session from the setup stage onward. You decide which Kit to use and which game mode to play. You also get the controls that let you manage the session while players are taking part.
So, if your goal is:
“I want to create the game and have everyone else play it,”
you need the hosting side of Gimkit.
If your goal is:
“Someone already created a game and gave me a code,”
you are a player, not the host.
How hosting is different from joining a Gimkit game
Joining is usually much simpler. A player receives the game information from the host and enters the game through the available joining method.
Hosting starts earlier.
You need to choose the Kit, select the live game option, set up the game, and reach the lobby. Only then can you give players the information they need to enter.
So if you have been searching for “Gimkit host join”, first decide which side you are on. If you created the game, you need the host flow. If somebody else created it, you need the player join flow.
Which part of the process you need to complete as the host
For a normal live session, your path looks like this:
Choose a Kit → start a live game → choose the mode → set the options → open the lobby → share the code or link → wait for players → start the game.
Once you understand that path, the rest is much less confusing.
How Do You Start Hosting a Gimkit Game?
If you already have your Kit ready, you can move straight into the hosting process. You do not need to search for a separate “host game” page and hope you found the right one.
Start from your Gimkit account and work from the Kit you want to use.
Sign in and choose the Kit you want to use
First, sign in to Gimkit.
From there, find the Kit you want to play. A Kit is the set of questions you want to use in the game.
If you already made a Kit, choose that one. If you have not made one yet, you will need to create or select the questions you want before you can run the session.
This is the first point where it helps to slow down. You do not need to worry about the student join code yet. That comes later, after you start the live game.
Start a live game and choose a game mode
Once you have the right Kit open, choose the option to play it as a live game.
Gimkit will then ask you to choose a game mode. The exact choices can depend on what Gimkit currently offers and which options are available to your account.
Do not feel like you need to pick a mode just because it sounds popular. The better choice is the one that fits what you are trying to do.
For example, a short classroom review may need a different setup from a longer group activity.
The important thing here is that you are still in the setup stage. You have not started the actual student session yet.
Set the options that appear before the game starts
After choosing the mode, you will see the settings available for that game.
Read these options before moving forward. Some settings affect how long the game runs, how players participate, or what happens during the session.
You do not have to change every setting. If the default setup works for what you are doing, you can leave it alone.
Once the settings look right, continue to the lobby.
That lobby is where the important joining information appears.
How Do You Get Your Gimkit Game Ready Before Students Join?
Reaching the lobby does not mean the game has already started. It means the game is ready for players to come in.
This is where you should make sure the session is set up the way you want before sending the code to everyone.
Choose the game settings that match your session
Look through the options shown for your selected game mode.
If you are running a quick review, you may want a simple setup that gets everyone playing without extra changes. If you are running a longer activity, take a little more time with the available game settings.
The key is to decide these things before everyone joins.
Otherwise, you may end up trying to explain changes while students are already waiting in the lobby.
Decide how players will enter and participate
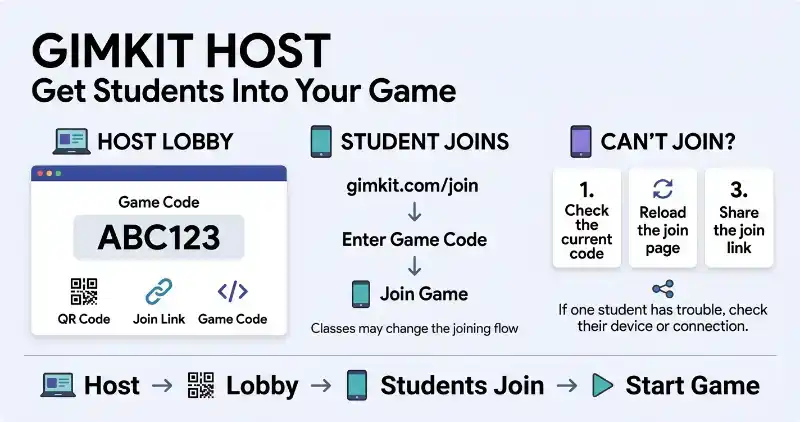
Your players need a way to get into the game. Gimkit can provide joining information such as a game code, QR code, or direct join link, depending on the current game setup.
You do not need to manually create a special code yourself.
The game generates the joining information as part of the live-game setup.
So if you were searching for “Gimkit host code,” you are looking for the code shown after you have started setting up the live game and reached the lobby.
Move from setup to the game lobby
Once the settings are ready, continue to the lobby.
Now you have moved from creating the session to getting people into it.
This is an important point in the process because the next problem is no longer “How do I create a Gimkit game?”
It becomes:
“How do I get everyone into the game I just created?”
Where Is the Gimkit Host Code, and How Can Students Join Your Game?
The host code is one of the main things people look for when they search Gimkit host.
The simple answer is that the code is provided in the live-game lobby. You do not normally need to invent your own code.
Once your game is ready, look at the lobby screen for the joining information.
Find the game code in the lobby
After you have selected your Kit, started the live game, chosen the game mode, and reached the lobby, look for the displayed game code.
That is the code you can give to your students or other players.
Keep the host screen open while people are joining. You will need it to see who has entered and to start the game when everyone is ready.
If you are looking at the wrong Gimkit page and cannot see a code, you may not have reached the live-game lobby yet.
Share the code, QR code, or join link
Once you can see the joining information, give it to the people who need to play.
You can use the method that works best for your group. For some people, typing a short code is easiest. In a classroom, a QR code can be handy because students can scan it instead of typing.
A direct join link can also make the process easier when you are sharing the game through a classroom platform or message.
The important part is that everyone needs to enter your live game, not simply open Gimkit’s homepage.
Help students enter the correct game
If someone says, “I joined Gimkit, but I don’t see your game,” that does not always mean your game is broken.
They may simply be on the wrong page or have not entered the game information correctly.
Give them the joining information shown on your host screen. Then wait for their name to appear in your lobby.
This gives you a simple way to confirm that they actually reached your game.
What Happens Once Students Are in the Gimkit Lobby?
Once players start appearing in the lobby, you have one last chance to make sure everything is ready.
You do not need to rush into the game just because the first few students joined.
Look at the lobby and make sure the people you expect to play are actually there.
Confirm that the right players have joined
Watch the player list as people enter.
If you are running a classroom game, this is a useful moment to make sure the expected students are showing up.
If someone is missing, do not start immediately. Give them a moment to enter the game using the code or link.
You can solve many “my student can’t join” situations simply by catching the issue before you start.
Handle a player who needs to leave or rejoin
Sometimes someone enters the wrong game, uses the wrong name, or needs to reconnect.
Deal with that before starting when possible.
The exact controls available to the host can depend on the game and current Gimkit features, so use the options shown on your host screen rather than assuming every game has identical controls.
The main idea is simple: get the right players into the correct lobby first.
Start the game when everyone is ready
When the players are in and your setup looks right, start the game from the host screen.
At this point, the process has moved from lobby setup to live play.
You have already done the harder part:
- selected the Kit
- chosen the game mode
- set the options
- opened the lobby
- shared the joining information
- brought players into the game
Now you are ready to run the session.
How Do You Manage the Gimkit Game While You Are Hosting?
Once the game starts, your job changes a little. You are no longer just getting people into the lobby. You are now running the live session.
You may want to watch the players, follow the game, use the controls available to you, or end the session when you are finished.
You do not need to control every little thing. Keep the host screen open and use the controls that apply to the game you selected.
Follow the game and player activity
While players are answering questions and playing, the host screen gives you a way to follow what is happening.
You can use the available player and leaderboard information to see how the session is going.
This can be useful in a classroom because you can quickly see whether the game is active and whether players are still connected.
Remember that the exact information shown can vary by game mode. If you do not see a particular option, it does not necessarily mean something is wrong. The selected mode may simply use a different set of host controls.
Use the controls available during the session
Gimkit provides hosts with controls for managing parts of a live game. Depending on the game mode and current features, you may have options related to players, sound, the leaderboard, or other parts of the session.
The safest approach is to use the controls actually shown on your host screen.
You do not need to change settings just because they are available. If the game is running normally, let it run and step in only when you need to manage something.
Finish the game when the session is over
When you are ready to finish, use the ending control available to the host.
Do not simply close the browser if you are trying to properly finish the session. Use the game controls first so the live game can end normally.
If you are teaching a class, this is also a good time to tell students that the session has ended before they leave the game.
Can You Host a Gimkit Game as a Student?
This is where things can get confusing because joining a Gimkit game and hosting one are not the same thing.
A student can normally join a game created by a host. But if you are a student asking, “Can I create and run my own Gimkit game?” you need to look at the account and hosting requirements rather than treating the student join process as the hosting process.
What students can do when they are invited to a game
If your teacher or another person is hosting, you can join their live game using the joining information they provide.
You do not become the host just because you entered the game.
The person who created and started the live session remains in control of the host side.
So if your goal is simply to play with classmates, you do not need to follow the hosting steps from earlier in this article.
What changes when a student wants to become the host
If you want to host your own game, you are no longer using the normal student joining process.
You need access to the part of Gimkit that lets you create and host the game.
That means you should sign in to the appropriate account and see whether you have access to the Kit and live-game hosting features you want to use.
This is an important distinction because searching for a Gimkit host join code will not solve a problem where your real goal is to create your own game.
What to do if your school or teacher setup limits hosting
A school may have its own rules about student accounts, classroom activities, or what students are allowed to do.
If you are unable to host even though you can join games, first check whether the limitation comes from the account you are using.
If this is a school-managed account, your teacher or school administrator may also be the right person to ask.
Do not assume that a missing hosting option means the entire Gimkit service is unavailable to you. The account type and current permissions can matter.
Do You Need a Gimkit Account to Host a Game?
This question comes up because people often see that students can join games without going through the same account setup as the host.
The two situations are different.
If you want to create and host a Gimkit game, you should expect to use a Gimkit account. Joining somebody else’s game is a separate process.
What account you need to create and host a game
To create Kits and host live games, you need access to a Gimkit account that supports those actions.
If you have not created an account yet, start there instead of looking for a hidden host login page.
Once you are signed in, you can work from your Kits and begin the live-game setup described earlier.
If you cannot find the hosting options after signing in, check that you are using the correct account and that the feature you want is available to that account.
Why joining a game is different from hosting one
A player does not need to create the live session.
The host has already done that work.
That is why the joining process can be much shorter. The player simply receives the information needed to enter the existing game.
So when you see searches such as “Gimkit host without login,” be careful about what the person actually means. They may be asking whether players can join without logging in, rather than whether a host can create a game without an account.
What “without login” means for a host versus a player
If you are the person creating the game, do not confuse the player join experience with the host experience.
A host needs to access the tools used to create and run the session. A player is entering a session that already exists.
That is the key difference.
If your goal is to host and you cannot access the hosting dashboard, signing out and trying to join through a student-style entry page will not turn you into a host.
Can You Host a Gimkit Game for Free?
If you searched “Gimkit host free,” you are probably trying to avoid paying just to run a game.
The first thing to understand is that having a free account and having access to every Gimkit feature are not necessarily the same thing.
Gimkit offers a free account option, but features and limits can change over time. So check the options shown on your account before planning a session around a feature you have not tested.
What free hosting allows
A free Gimkit account can give you access to parts of the platform without requiring you to immediately buy a paid plan.
For a simple session, start by checking whether the Kit and live-game options you need are available in your account.
You may not need a paid plan simply because you want to host a game.
When a paid feature or plan may matter
A paid option may matter if you need a particular feature, limit, or capability that is not included with the free account.
This is where it is better to check the current Gimkit account options rather than rely on an old article or video.
Gimkit can change its plans and feature availability, so an older “free vs paid” explanation may no longer match what you see today.
How to tell whether you actually need a paid option
Start with the game you want to run.
Choose your Kit, begin the setup, and see whether the options you need are available.
If everything required for your session works with your current account, there is no reason to assume that you need a paid plan just because you are hosting.
If Gimkit asks you to upgrade for a specific feature, then you have a clear reason to check that feature’s current plan requirements.
Why Can’t Students Join My Gimkit Host Game?
You reached the lobby, shared the code, and someone still says, “I can’t join.”
Honestly, this is one of those problems that feels bigger than it usually is.
Start with the joining information on your host screen. Then work through the problem one piece at a time.
The game code is not working
First, make sure the player is using the current code shown for your live game.
Do not send an old code from a previous session. A different game can have different joining information.
If the player entered the code manually, have them check for a typing mistake and try again.
If you have a QR code or direct join link available, try that instead. This can remove a simple typing problem from the equation.
Students cannot see or enter the game
If the student can open Gimkit but cannot get into your game, check whether they are actually using the correct joining method.
The host should provide the information shown in the live-game lobby. The student should then use that information to enter the specific session.
If several students have the same issue, check your host screen first. If nobody is appearing in the lobby, the problem may be with how the game is being shared rather than with one student’s device.
The game is ready but players still cannot connect
If the correct code or link is being used and players still cannot connect, take a simple reset approach.
Have the affected player leave the failed attempt and try the joining process again. If possible, test with another device or browser to see whether the problem affects everyone or only one person.
If other students can join while one person cannot, the issue is more likely specific to that player’s device, browser, connection, or account situation.
If nobody can join, look at the host session itself and check whether the live game is still open and waiting for players.
What Should You Know Before Hosting Your Next Gimkit Game?
Most of the common hosting questions have already been answered above, so there is no need to repeat the whole hosting process here.
A few smaller questions can still matter, especially if you are new to Gimkit.
Can students join without creating a Gimkit account?
Players can often enter a hosted game through the joining process without needing the same account setup used by the person hosting.
The important point is that joining an existing game is different from creating one.
If your students are having trouble joining, follow the joining information shown by the host instead of assuming that every player needs to create a full Gimkit account.
Can the host participate in the same game?
This depends on the game mode and the features available in the current version of Gimkit.
Do not assume that the host screen and player experience are identical. Some modes may give the host different controls or participation options.
If you specifically want to play alongside your students, check the options shown for the game mode you selected before starting the session.
What happens to the game after the host ends it?
Ending a live game brings that session to a close. Players should not expect to continue playing the same live session after the host has ended it.
If you want to run another session, you can return to your Kits and start another live game when you are ready.
That is also why it is worth checking that everyone is finished before you use the end-game control.
If you came here because Gimkit host was confusing, the main idea is actually pretty simple.
You first choose your Kit and start a live game. Then you select the game mode and settings, move into the lobby, and share the code or join link. Players enter your session, you confirm that everyone is ready, and then you start the game.
If the problem is not hosting itself but something going wrong along the way, identify where the process stopped. No host option? Check the account. No code? Check the live-game lobby. Students cannot join? Check the current code or link. Game already running? Use the host controls shown for that mode.
Once you separate those situations, Gimkit host becomes much easier to understand and use.
Frequently Asked Questions About Gimkit Host
Can I host a Gimkit game for a large class?
The number of players you can host can depend on your Gimkit account, game mode, and current platform limits. If you are planning a large classroom session, check the limits shown in your account before starting.
Can I reuse the same Kit for another Gimkit host game?
Yes. A Kit can be used as the starting point for another live game. You can return to your Kits, select the one you want, and begin a new hosting session.
A new live session should be treated separately from an earlier game, so do not assume that an old joining code will work for the new session.
Can I host Gimkit from a phone or tablet?
Gimkit can be accessed from supported web browsers, but the exact hosting experience can vary depending on the device and current platform features.
For a classroom session, it is a good idea to open the host dashboard before students arrive. This gives you time to make sure the Kit, game mode, and controls are working as expected.
Can I share a Gimkit host game remotely?
Yes. A live Gimkit game can be shared with players who are not physically in the same room, as long as they have the information needed to join the session.
Instead of reading the code aloud, you can share the available join link or other joining option with remote players.
Why does my Gimkit host screen look different from a tutorial?
Gimkit changes its interface and features over time. Tutorials made with an older version may show buttons, menus, or layouts that no longer look exactly the same.
If the names or positions of controls are different, focus on the function you need rather than trying to reproduce an old screenshot exactly.
Is a Gimkit host the same as a teacher?
No. “Host” describes the person running the live game. A teacher may be the host, but the terms do not mean exactly the same thing.
The important distinction is whether you are creating and controlling the live session or simply joining someone else’s game.
Conclusion: Gimkit Host Made Simple
If you searched for Gimkit host because you wanted to run a game but were unsure where to begin, the process is easier once you separate hosting from joining.
Choose your Kit, start a live game, select the mode and settings, and move into the lobby. From there, share the current game code, QR code, or join link with your players. Once they appear in the lobby, check that the right people are there and start the session.
If something goes wrong, do not start over randomly. Find the point where the process stopped. Your issue may be the account, game setup, joining information, lobby, or connection.
That simple approach can save a lot of time the next time you host a Gimkit game.